1. Introduction to Vue, CDN and Flask with REST API
1.1. What is a CDN?
- A CDN (Content Delivery Network) refers to a technology that delivers the content of a provider more efficiently to users who are geographically or physically far away.
- When a user downloads content from a distant server, it can take a long time. To address this, the content is cached on a Cache Server closer to the user. When content is requested, the Cache Server responds instead of the main server.
Bootstrap CDN Introduction: https://getbootstrap.com/docs/4.5/getting-started/introduction/
2. vue_test.html
2.1. Adding Bootstrap CDN Code
- Place the
vue_test.htmlfile inside the templates folder. - Add sample code by referencing the Bootstrap Guide (https://getbootstrap.com/docs/4.5/getting-started/introduction/).
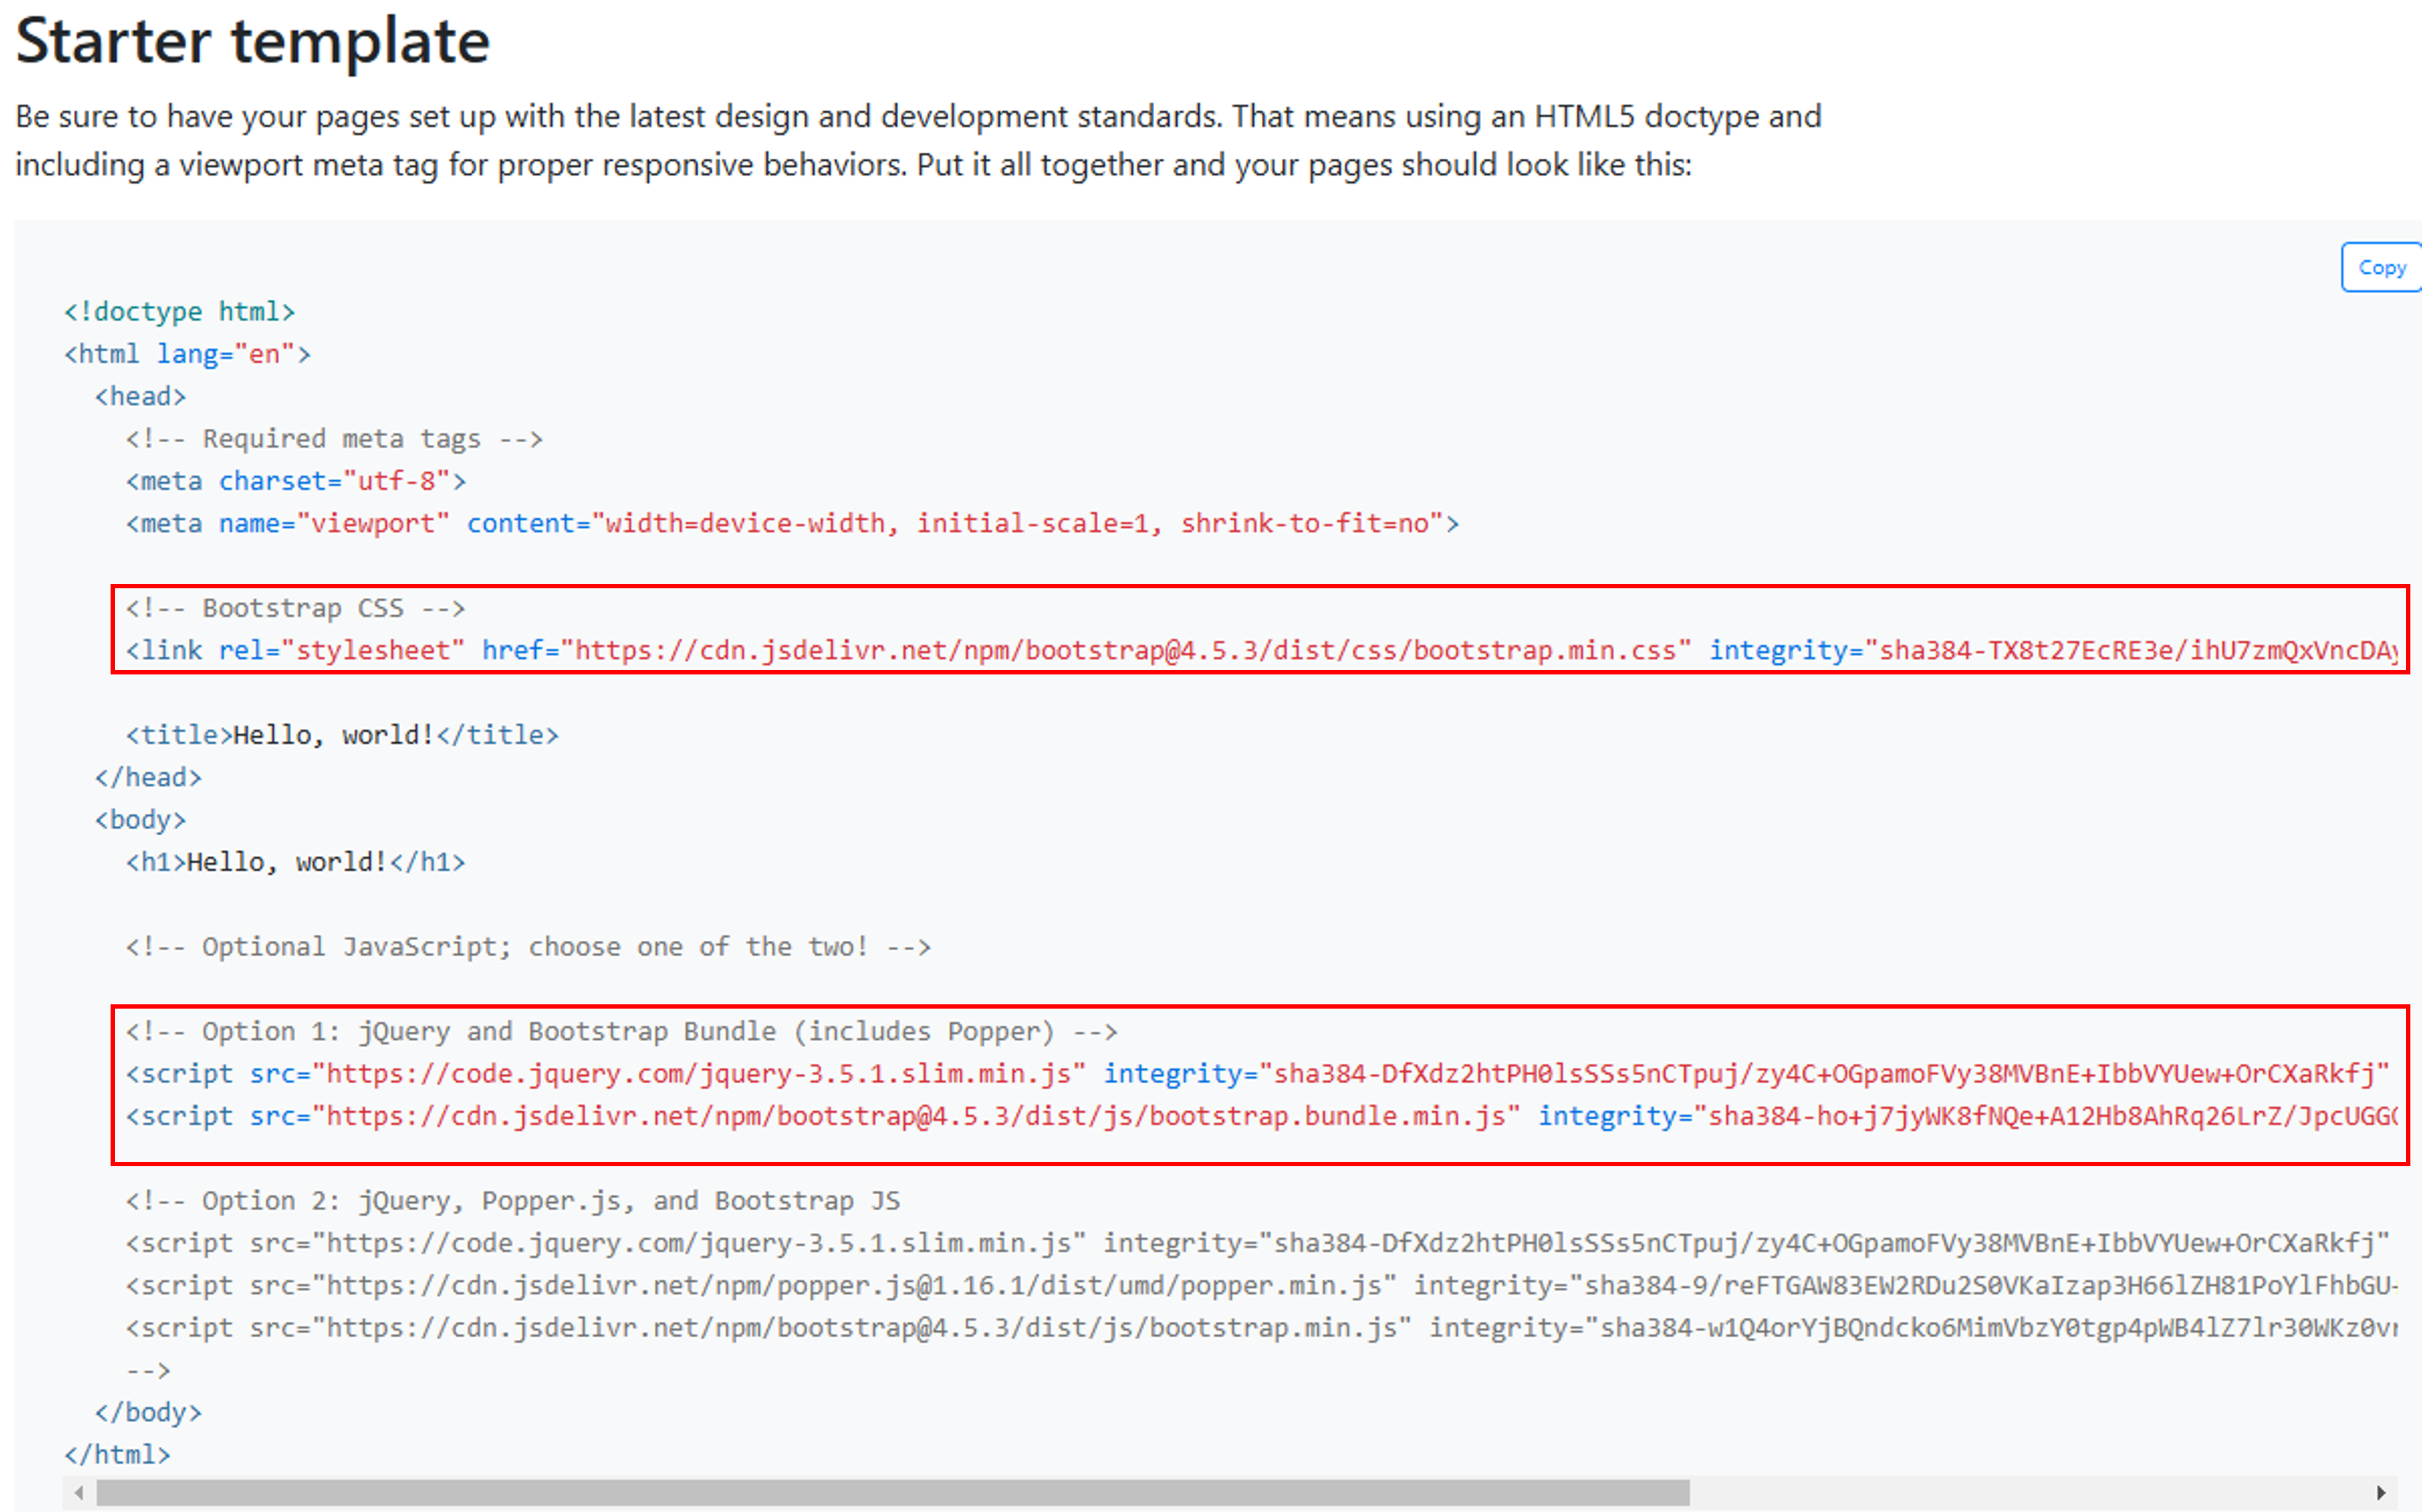
How to use a CDN: Instead of placing important JavaScript or CSS files on your server, you can use a specific URL to allow the browser to automatically download them when opening the webpage.
2.1. Adding Vue Code
Wrap the display area inside the
<body>tag using the<div id='vue_test'></div>tag.Add a Bootstrap button inside the
<div id='vue_test'></div>tag. (Reference Example: https://getbootstrap.com/docs/4.5/components/buttons/)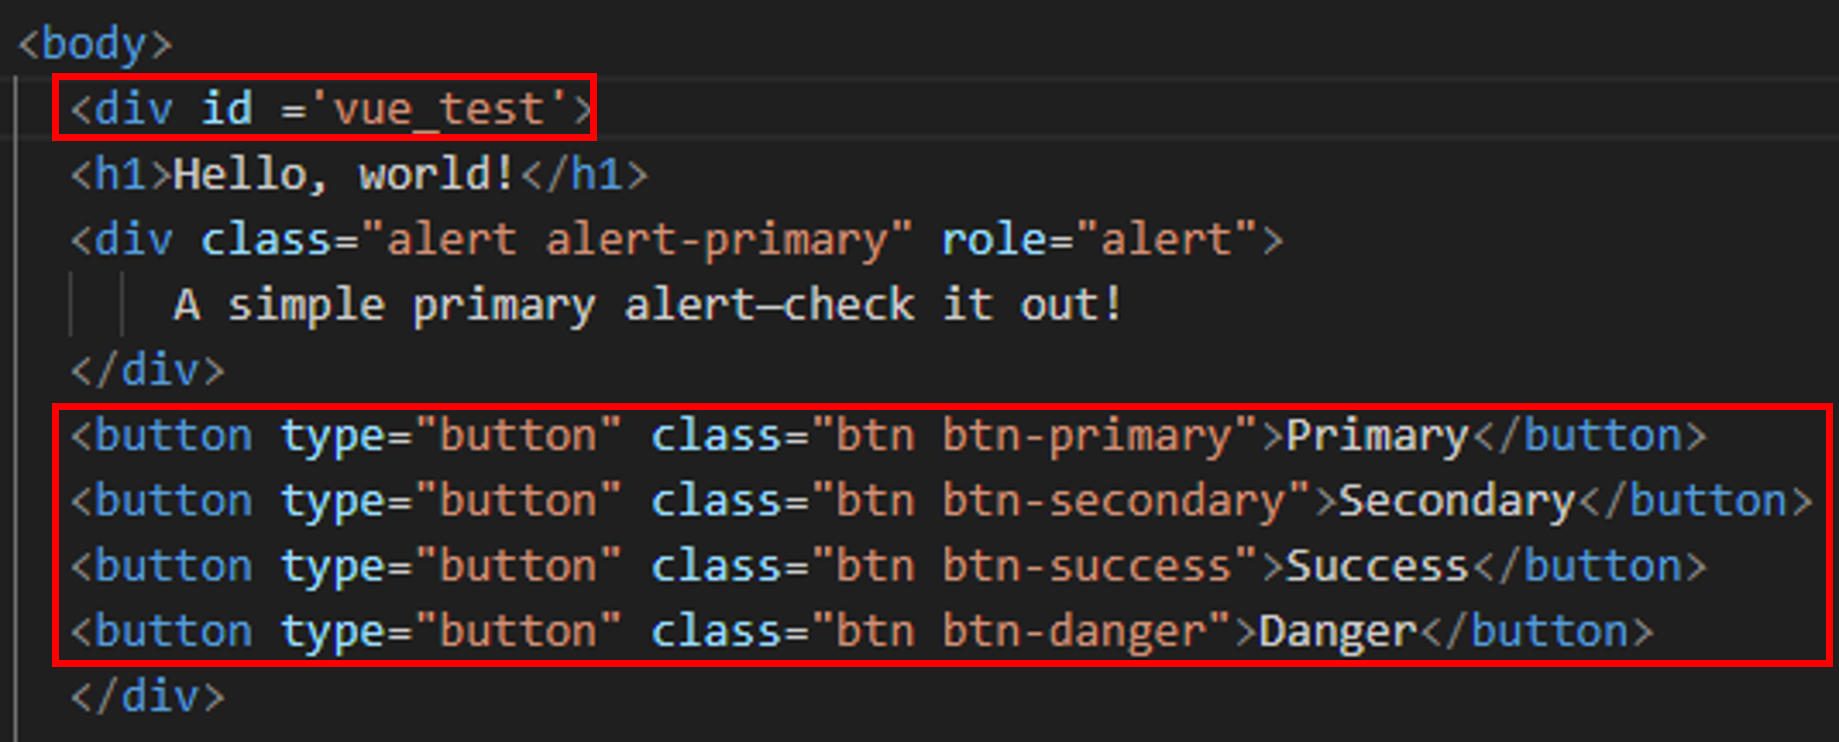
Add a Vue.js CDN link above the
</body>tag.
To use Axios, add the following script tag right after the Vue.js CDN link:

2.2. Vue + Axios Code Integration
Use Axios to call the Flask REST API.
Add a button using Bootstrap for testing API calls.
HTML (Vue + Axios Button Example)
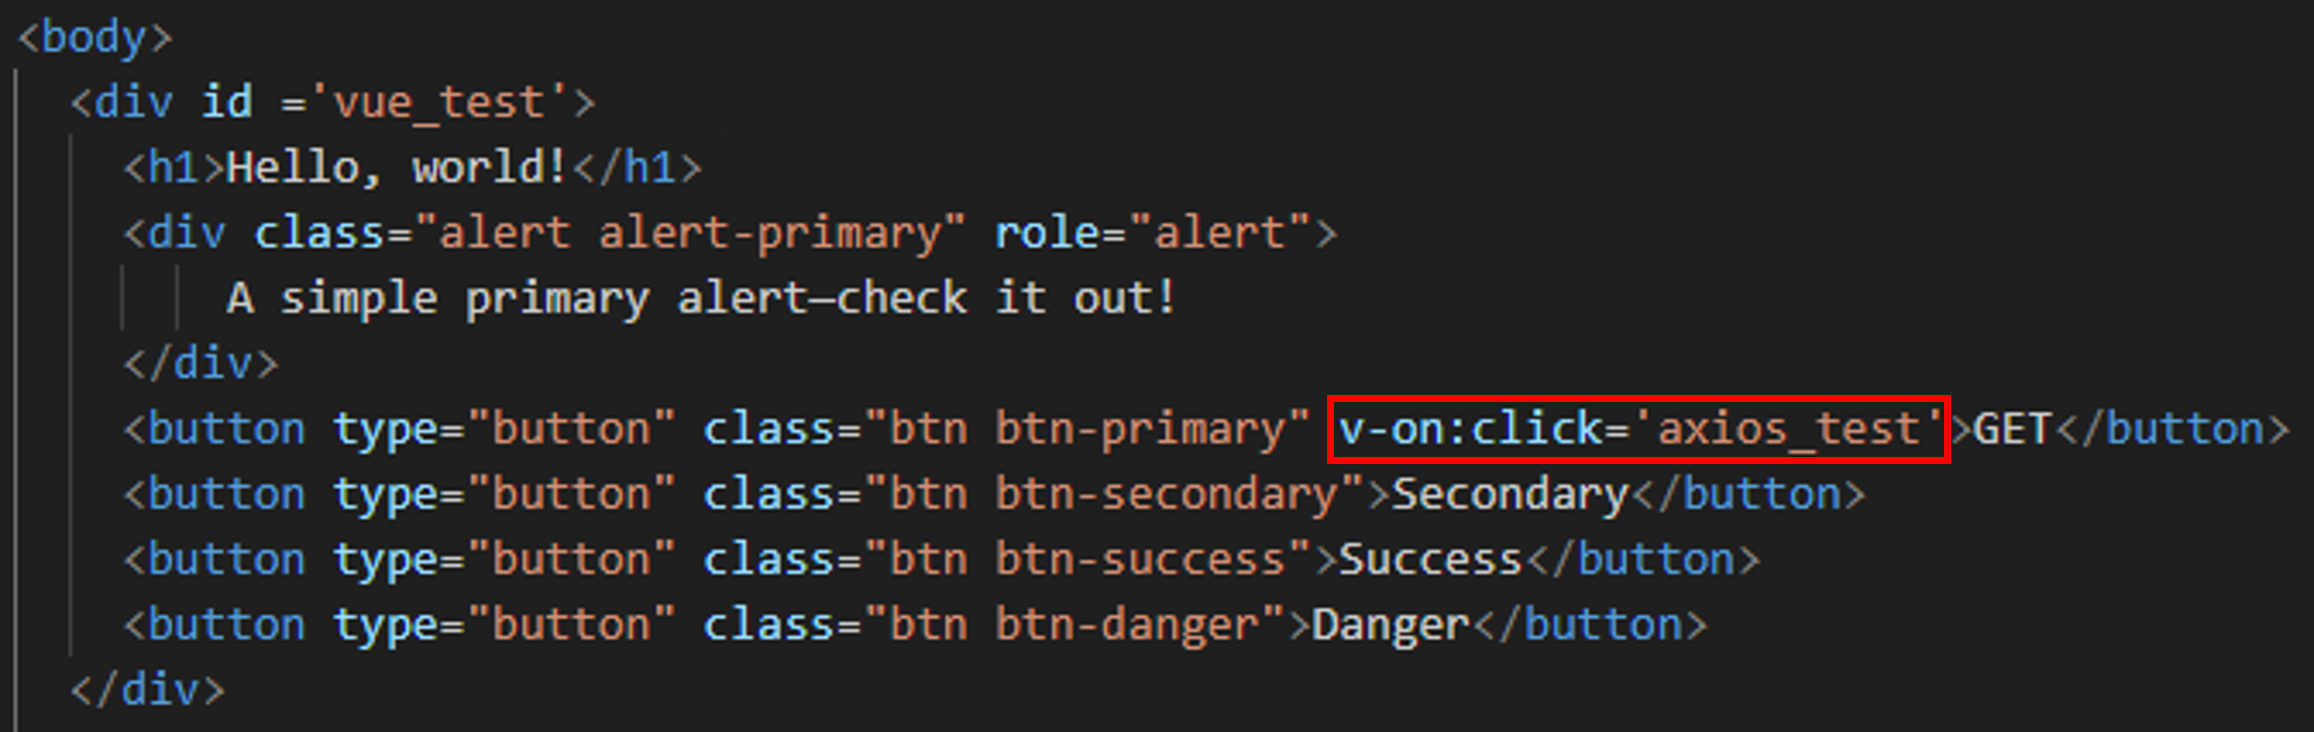
Add the following code to enable Axios functionality:

Include Vue.js and Axios CDNs
- Vue.js and Axios are included via CDN to enable Vue functionalities and REST API requests in this HTML document.
Initialize Vue Instance
- A new Vue instance is created and linked to the DOM element with the
id="vue_test". This binds the Vue app to the specific part of the HTML page.
Define Axios Method
- The
axios_test()method is defined inside themethodsobject. This method will handle API requests using Axios.
Specify API Endpoint
- The
axios()function sends a GET request to the Flask REST API endpoint athttp://localhost:5555/test.
Handle API Response
- The
.then()block handles a successful API response and logs it to the console.- The
.catch()block handles any errors that occur during the API request and logs them to the console.
※ The final vue_test.html file can be found in my GitHub PPP repository. (https://github.com/Kim-William/Personal_Python_Projects)
2.3. Flask API Example
The Flask server code is set up to respond to the Vue.js Axios request with JSON data.
# Flask API Example Code
from flask import Flask, make_response, jsonify

app = Flask(__name__)

@app.route('/test', methods=['GET'])
def index():
    # Define the data to return
    data = {
        'success': 'True',
        'name': 'kim',
        'email-addr': 'kim.woongkeol@gmail.com'
    }
    # Return the response as JSON
    return make_response(jsonify(data), 200)

# Run the Flask app
app.run(host='127.0.0.1', port=5555)
* Serving Flask app '__main__' * Debug mode: off
WARNING: This is a development server. Do not use it in a production deployment. Use a production WSGI server instead.
 * Running on http://127.0.0.1:5555
Press CTRL+C to quit
127.0.0.1 - - [04/Jan/2025 15:05:12] "GET /test HTTP/1.1" 200 -
2.4. How This Works
Run
vue_test.html:- Open the
vue_test.htmlfile in a browser (e.g., Chrome) or use the Live Server extension in Visual Studio Code.
- Open the
Run Flask API Example Code:
- Start the Flask server by running the provided Flask example code.
- Ensure that the port specified in the Flask app (e.g.,
5555) matches the port configured in theaxios_testmethod ofvue_test.html.
Enable Developer Mode:
- For Chrome browser (Windows), press
F12to open Developer Tools.
- For Chrome browser (Windows), press
Open Console Tab:
- Navigate to the Console tab within Developer Tools.
Click the GET Button:
- In the browser, click the GET button in the
vue_test.htmlinterface.
- In the browser, click the GET button in the
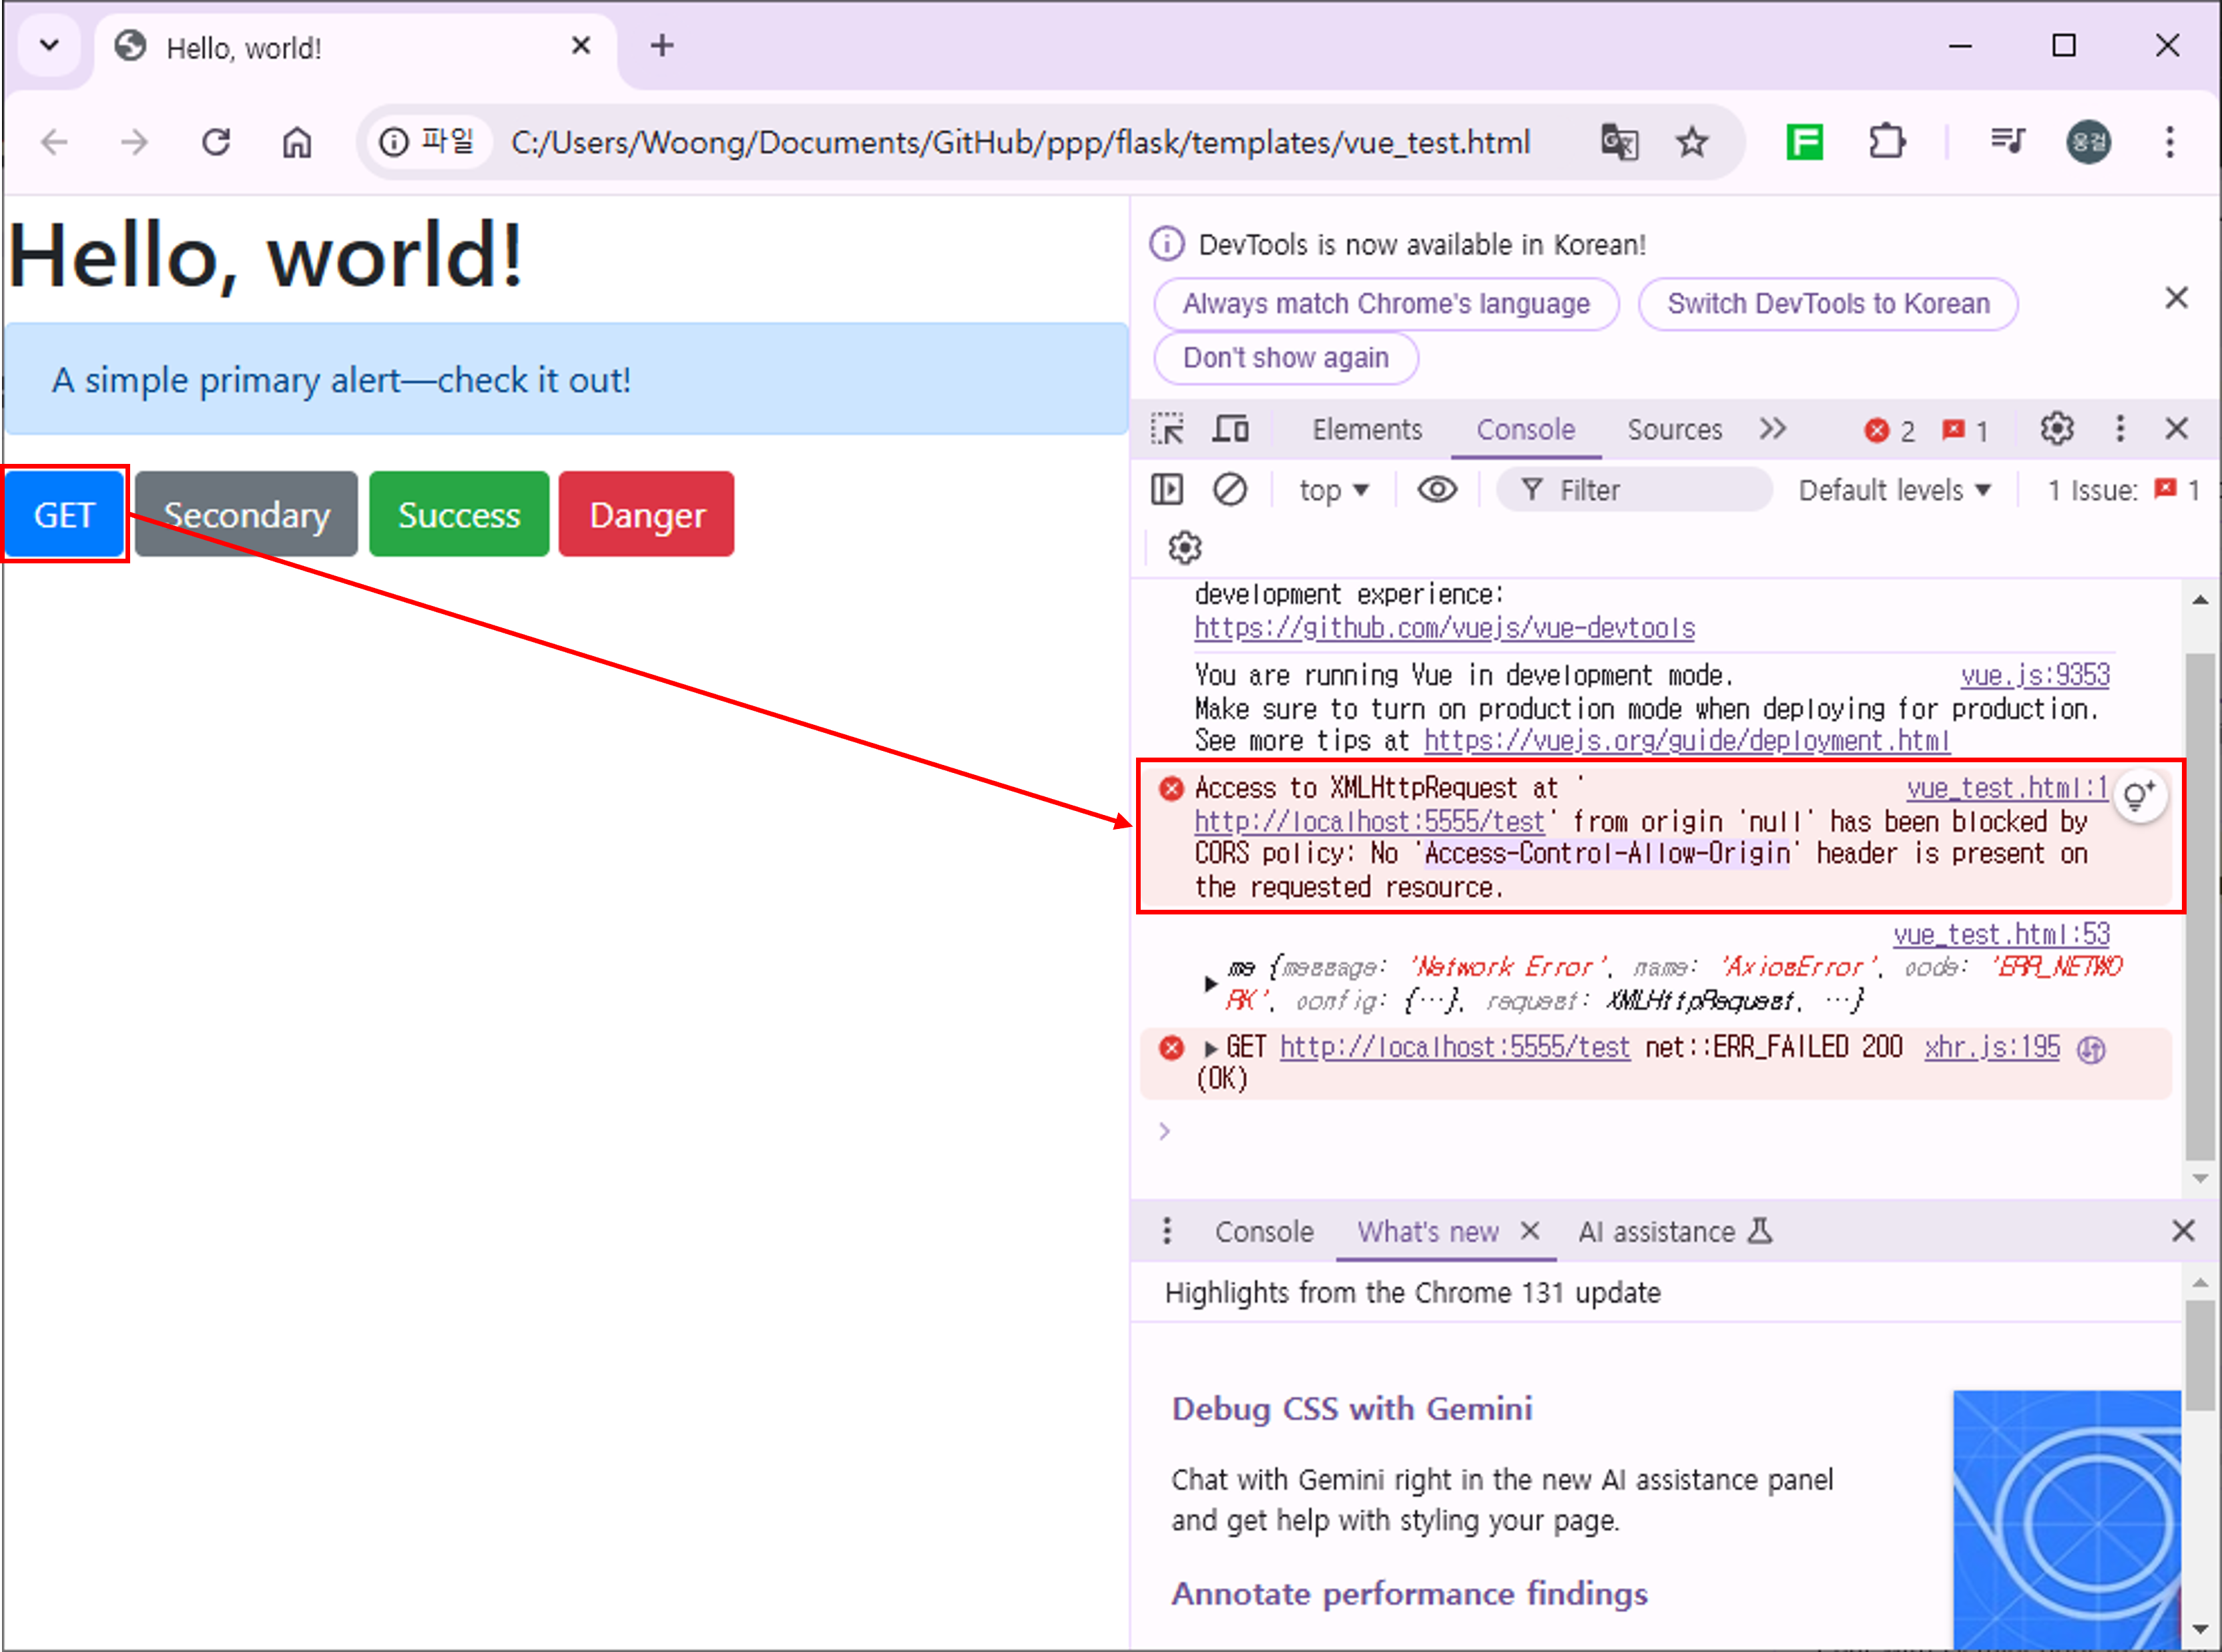
Check Console Output:
- After clicking the GET button, observe the output in the browser's Console tab.
- If the API request is successful, you should see the response from the Flask API.
Handle CORS Error:
- If an error related to
Access-Control-Allow-Originis displayed in the Console, it indicates a CORS policy issue. - Stop the Flask API and proceed to the next chapter.
- If an error related to
3. CORS (Cross-Origin Resource Sharing)
HTTP requests in web browsers can typically fetch data from different domains.
- Examples:
- Access a webpage:
www.woongkeol.com. - This webpage can use an
<img>tag to fetch an image file fromhttps://www.google.com/images/branding/googlelogo/2x/googlelogo_light_color_92x30dp.png. - It can also use a
<link>tag to fetch a CSS file fromhttps://fonts.googleapis.com/css2?family=Roboto:wght@400;700&display=swap.
- Access a webpage:
- However, any HTTP requests made inside
<script>tags (e.g., usingajaxoraxios) are restricted to the domain where the script originated.<script> // Restricted HTTP requests </script>
- This restriction applies to requests based on the same protocol, hostname, and port.
- This rule is called the Same-Origin Policy.
As developers started to use tools like
ajaxandaxiosto make HTTP requests inside<script>tags, the need arose to allow cross-domain requests within these scripts. This led to the introduction of the CORS (Cross-Origin Resource Sharing) guideline, which is implemented differently across languages.
3.1. Error: CORS Issue
If the HTTP response headers do not contain the required Access-Control-Allow-Origin information, browsers will block the request based on their security policies.
3.2. Supporting CORS in Flask
To enable CORS in a Flask application, you can use the flask_cors library.
3.2.1. Installation:
pip install flask_cors3.2.2. Enable CORS for All Routes:
!pip install flask_cors
from flask_cors import CORS

app = Flask(__name__)
CORS(app)  # Adds CORS headers to all requests and responses
3.3 Flask API Example with CORS Support
# Enabling CORS in Flask Example code
from flask import Flask, make_response, jsonify
from flask_cors import CORS

app = Flask(__name__)
# Enable CORS for all routes
CORS(app)

@app.route('/test', methods=['GET'])
def index():
    # Define the data to return
    data = {
        'success': 'True',
        'name': 'kim',
        'email-addr': 'kim.woongkeol@gmail.com'
    }
    # Return the response as JSON
    return make_response(jsonify(data), 200)

app.run(host='127.0.0.1', port=5555)
* Serving Flask app '__main__' * Debug mode: off
WARNING: This is a development server. Do not use it in a production deployment. Use a production WSGI server instead.
 * Running on http://127.0.0.1:5555
Press CTRL+C to quit
127.0.0.1 - - [04/Jan/2025 23:12:53] "GET /test HTTP/1.1" 200 -
3.4. How This Works
CDN Setup:
- Bootstrap and Vue.js are loaded using their respective CDNs in
vue_test.html.
- Bootstrap and Vue.js are loaded using their respective CDNs in
Vue + Axios:
- When the button is clicked, Axios sends a GET request to the Flask REST API at
http://localhost:5555/test. - The response from the API is logged in the browser's developer console.
- When the button is clicked, Axios sends a GET request to the Flask REST API at
Flask API:
- The Flask server listens for a GET request at
/testand returns a JSON response with the provided data.
- The Flask server listens for a GET request at
CORS:
CORS(app)is added to allow cross-origin requests from the frontend (Vue.js) to the backend (Flask).
3.5. Expected Output
- Frontend: When the button is clicked, the browser's console logs the following response:
{
  "success": "True",
  "name": "kim",
  "email-addr": "kim.woongkeol@gmail.com"
}
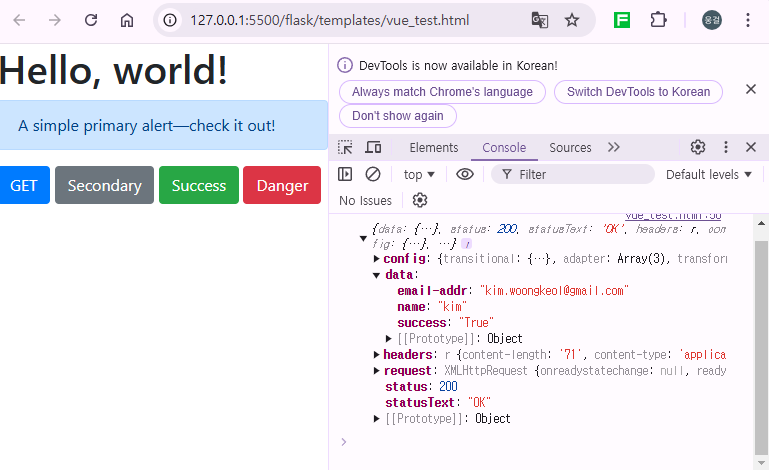
- Backend: The Flask server handles the GET request and responds with the JSON data.
4. REST API Implementation Example
4.1. REST API
- The goal is to create an API that retrieves parameter values in JSON format from a specific URI and returns data in JSON format.
- In Flask:
- Use Python's
dicttype for the response data. - Convert the
dictinto JSON format using thejsonify()function.
- Use Python's
4.2. Define REST API Methods
- When defining Flask APIs, specify the supported HTTP request methods in the
methodsparameter. - The method to extract parameter values depends on the request method:
GET,PUT, andDELETEmethods follow the same parameter extraction process.POSTuses a different process for parameter extraction.
- Use Flask's
jsonify()function to return data in JSON format.
# Define REST API methods Example Code
from flask import Flask, request, jsonify
from flask_cors import CORS

app = Flask(__name__)
# Enable CORS for all routes
CORS(app)

@app.route("/test", methods=['GET', 'POST', 'PUT', 'DELETE'])
def test():
    if request.method == 'POST':
        print('POST')
        data = request.get_json()
        print(data['email'])
    if request.method == 'GET':
        print('GET')
        user = request.args.get('email')
        print(user)
    if request.method == 'PUT':
        print('PUT')
        user = request.args.get('email')
        print(user)
    if request.method == 'DELETE':
        print('DELETE')
        user = request.args.get('email')
        print(user)

    return jsonify({'status': 'success'})

app.run(host='127.0.0.1', port=5555)
* Serving Flask app '__main__' * Debug mode: off
WARNING: This is a development server. Do not use it in a production deployment. Use a production WSGI server instead.
 * Running on http://127.0.0.1:5555
Press CTRL+C to quit
127.0.0.1 - - [05/Jan/2025 23:30:22] "GET /test?email=test@test.com HTTP/1.1" 200 -
GET
test@test.com
127.0.0.1 - - [05/Jan/2025 23:30:23] "OPTIONS /test HTTP/1.1" 200 -
127.0.0.1 - - [05/Jan/2025 23:30:23] "POST /test HTTP/1.1" 200 -
POST
test@test.com
127.0.0.1 - - [05/Jan/2025 23:30:24] "OPTIONS /test?email=test@test.com HTTP/1.1" 200 -
127.0.0.1 - - [05/Jan/2025 23:30:24] "PUT /test?email=test@test.com HTTP/1.1" 200 -
PUT
test@test.com
127.0.0.1 - - [05/Jan/2025 23:30:24] "DELETE /test?email=test@test.com HTTP/1.1" 200 -
DELETE
test@test.com
127.0.0.1 - - [05/Jan/2025 23:30:27] "GET /test?email=test@test.com HTTP/1.1" 200 -
GET
test@test.com
127.0.0.1 - - [05/Jan/2025 23:30:28] "POST /test HTTP/1.1" 200 -
POST
test@test.com
127.0.0.1 - - [05/Jan/2025 23:30:28] "PUT /test?email=test@test.com HTTP/1.1" 200 -
PUT
test@test.com
127.0.0.1 - - [05/Jan/2025 23:30:29] "OPTIONS /test?email=test@test.com HTTP/1.1" 200 -
127.0.0.1 - - [05/Jan/2025 23:30:29] "DELETE /test?email=test@test.com HTTP/1.1" 200 -
DELETE
test@test.com
5. Making HTTP Requests with Axios in Vue.js
5.1. Vue Template for Buttons
- Create buttons in your Vue template to trigger specific HTTP request methods when clicked.
- Modify the
vue_test.htmlfile's buttons as shown in the image above.
For the completed file, please refer to the 'rest_api_test.html' file in my GitHub repository.
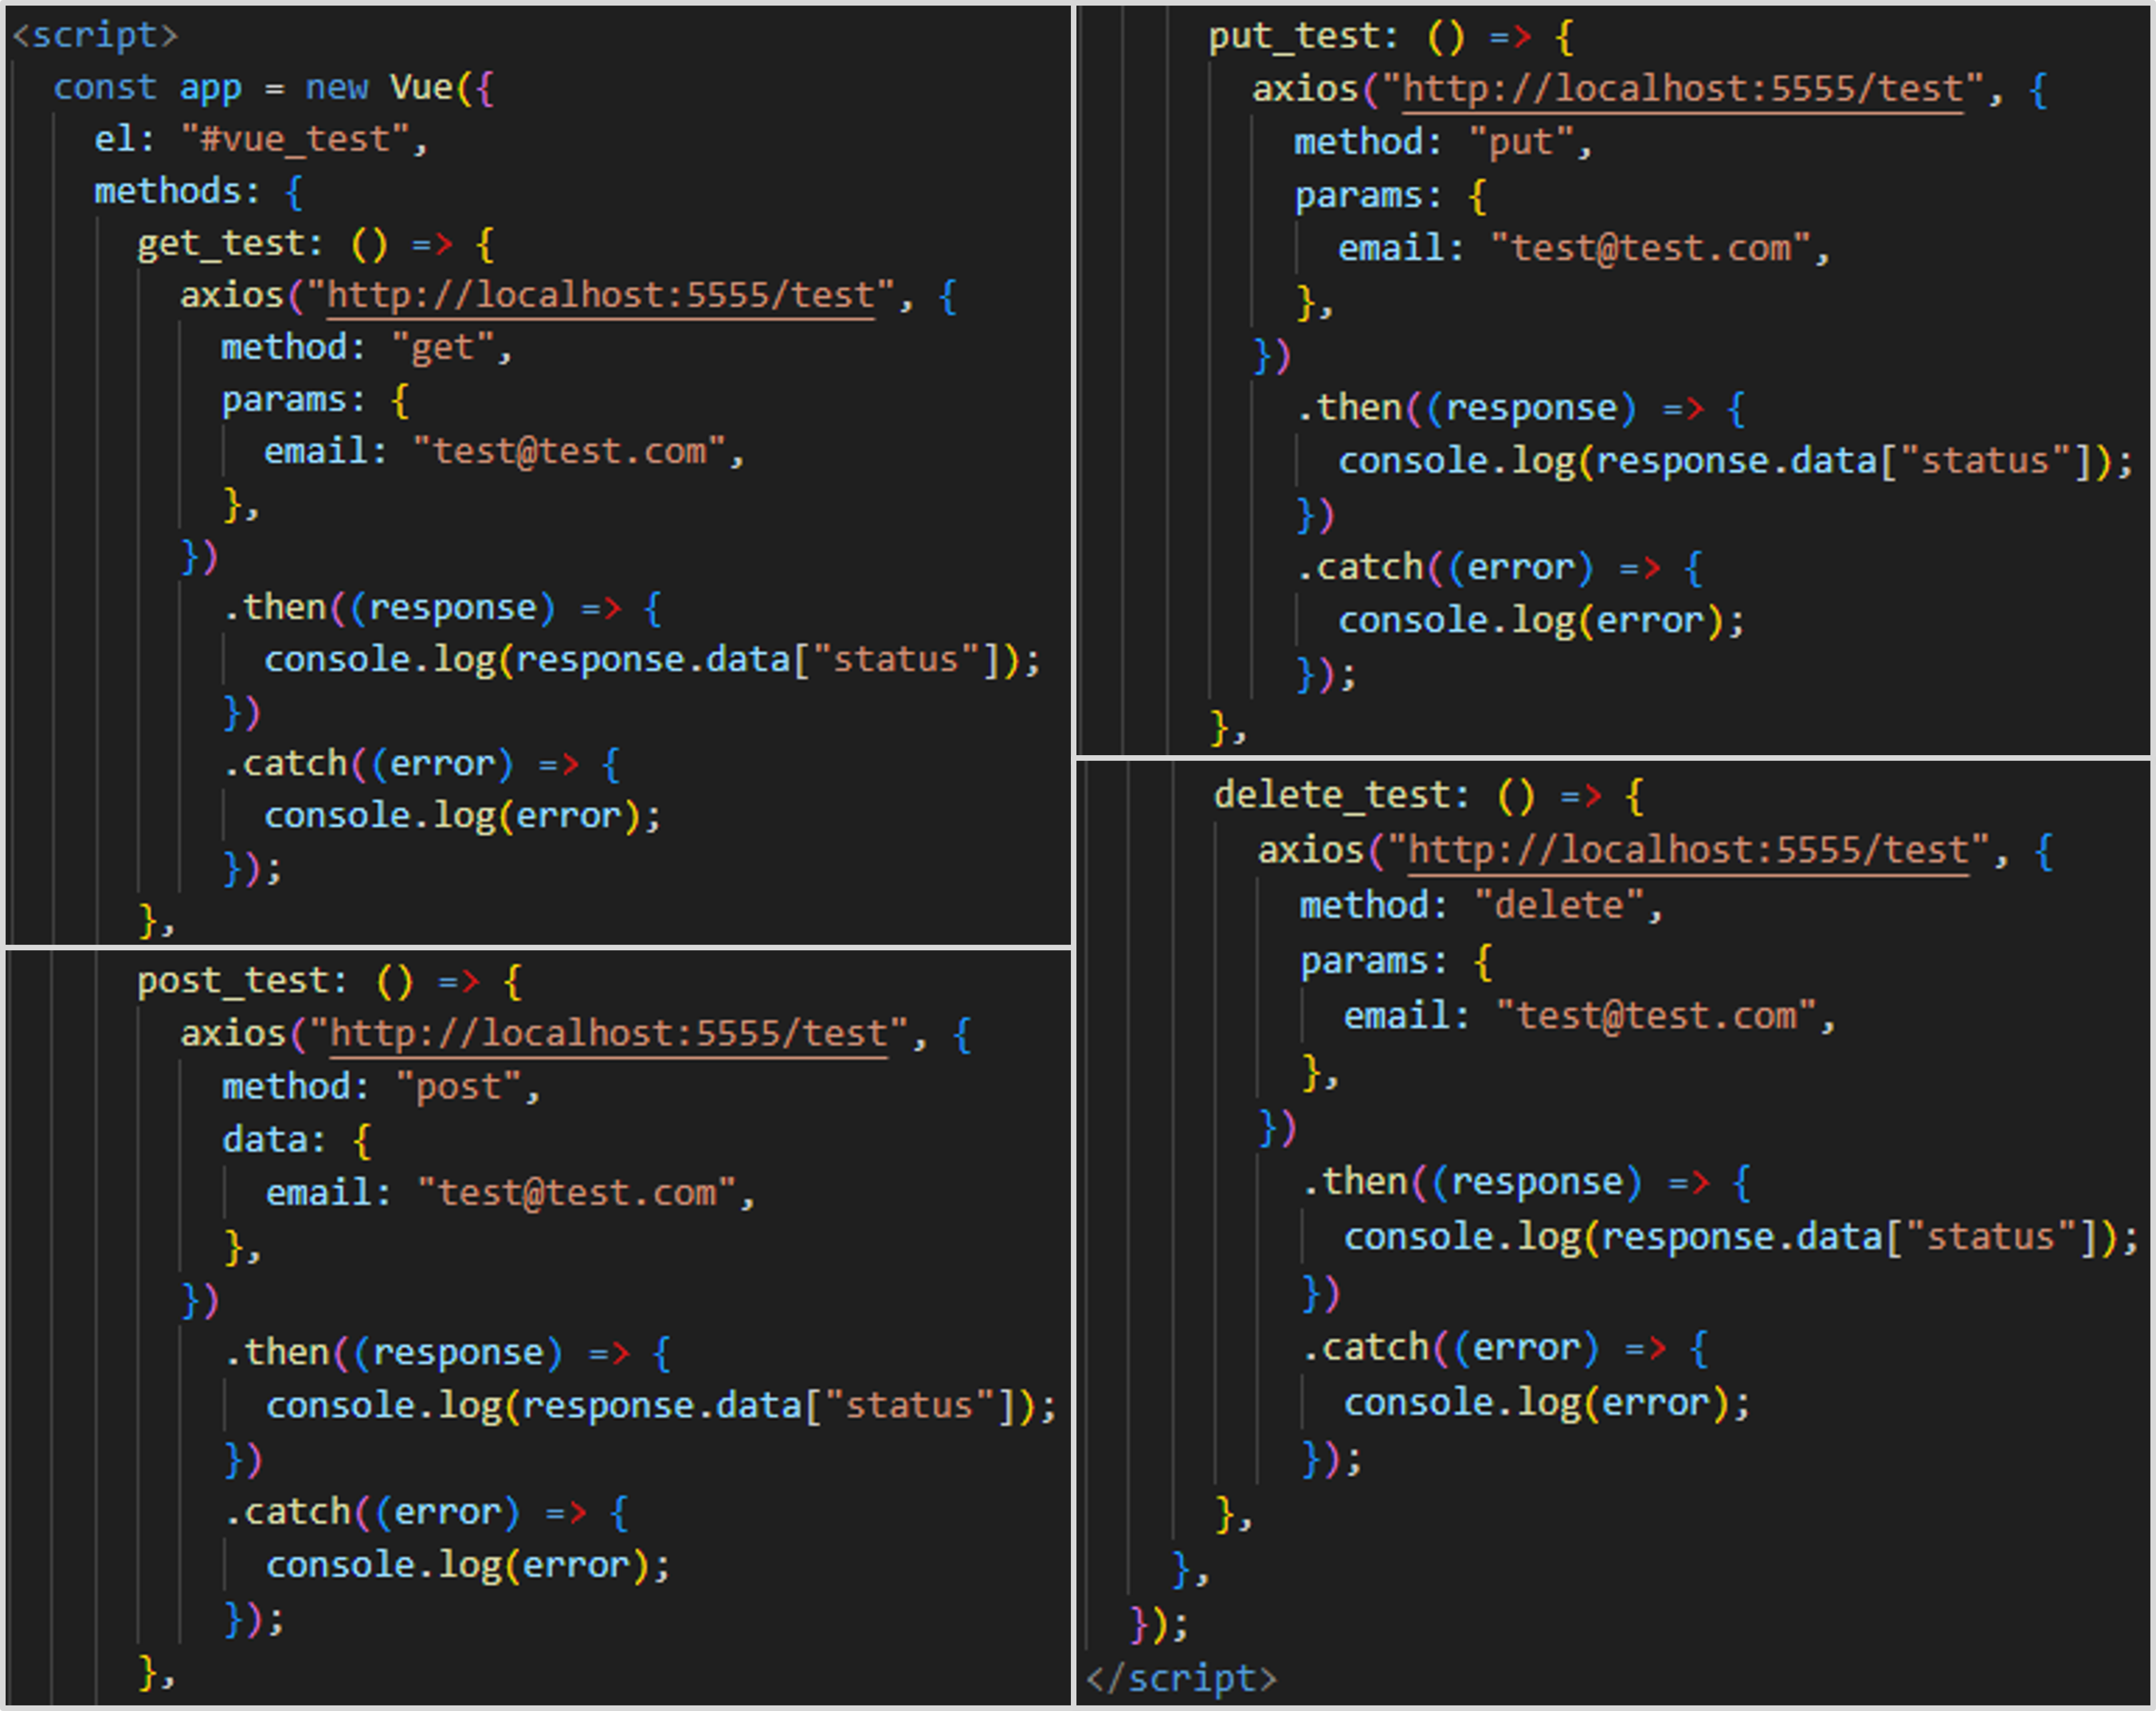
5.2. Vue Methods Using Axios
- Use Axios to send HTTP requests from the frontend.
- HTTP request method is specified using the
methodfield. - Parameter values:
GET,PUT, andDELETE: Include parameters in theparamsfield as JSON.POST: Include parameters in thedatafield as JSON.
- Extract response data using
response.data. - Modify the
const app = new Vuescript in thevue_test.htmlfile as shown in the image below.

6. HTTP Request Methods (Request Method)
- Indicates the purpose of the HTTP request from the client to the server.
- Commonly used methods include
GET,POST,PUT, andDELETE. Among these,GETandPOSTare most frequently used. - The way request data is delivered depends on the method.
6.1. Key Request Methods in HTML
- HTML only supports
GETandPOSTrequest methods.
GET: Retrieve Information (SELECT)
- Parameters are passed in the URL.
POST: Submit Information (INSERT)
- Parameters are included in the HTTP body, not visible to the user.
PUT (UPDATE) and DELETE (DELETE):
- Parameters are passed in the URL, similar to
GET.
- Parameters are passed in the URL, similar to
6.2. Summary
POSTis preferred for sensitive data as it doesn't expose parameters in the URL.- For RESTful APIs, it is recommended to use HTTP methods (
GET,POST,PUT,DELETE) based on their intended functionality.
This approach is referred to as being RESTful.